Individuals working in digital applications tend to prefer the Time Domain Reflectometer (TDR), while those involved in traditional RF applications consider the Vector Network Analyzer (VNA) to be a laboratory staple. The push for ever-faster data rates has fueled an analytical re-thinking of high-speed digital signaling. Contemporary wisdom views high-speed digital systems as high-frequency applications, where more traditional microwave analysis techniques apply. Once this concept is embraced, engineers often exploit the strengths of both the TDR and VNA, combining time and frequency domain analysis to accelerate design and development cycles. Both instruments can measure impedance, time delay, phase delay and reflection coefficient so they are often thought of as equals. This begs the question: Is there a quantifiable difference in measurement uncertainty between the TDR and VNA?
Characterizing the time delay of a passive device, such as coaxial cable assembly is a common use for the TDR and VNA. It is therefore an ideal vehicle for a performance comparison. How do the two compare under ideal test conditions, and the less-than-ideal environment of production testing? Do both instruments possess similar levels of measurement precision? This article answers these questions by examining the measurement uncertainty and repeatability of the TDR and VNA.
Description of Experiment
To understand the capabilities of any measurement system, it is important to test the system's response to a variety of inputs to avoid erroneous conclusions. For this discussion, the term "input" refers to a "Device Under Test" (DUT), which in this experiment were different cable assemblies from a variety of manufacturers, having a range of insertion loss and VSWR characteristics. In a manner consistent with commonly used production test practices, measurements of the time delay of the cable assemblies described above were measured with a TDR and a VNA. The resulting measurement uncertainty of the two instruments under these conditions was then compared.

A sample of six new cable assemblies were used in the experiment, each equipped with SMA pin connectors. Table 1 details their loss, VSWR and physical length characteristics. The electrical data in Table 1 was acquired through VNA analysis. The experiment consisted of two rounds of testing. Within a round, each sample was connected to the TDR or VNA and measured five consecutive times, without being disconnected or disturbed ("repeat testing"). After five measurements, the sample was removed from the instrument and not reconnected until the next round of testing ("round testing"). The sample assemblies were labeled 1 through 6 and their test order within each round was randomized to reduce test bias. Repeat testing reflects instrument uncertainty, while round-to-round testing reflects measurement reproducibility or test uncertainty.

Figure 1 Sample assemblies.

Figure 2 TDR waveform display for time delay measurement.
Test Configurations
During the TDR portion of testing, the sample assemblies were connected directly to the TDR sampling head while the opposite end was terminated with a 3.5 mm precision open standard. This was done to ensure a well-defined and controlled termination. In the VNA portion of testing, the sample assemblies were connected between ports 1 and 2. In both TDR and VNA testing, standard RF cable assembly care and handling practices were exercised. Figure 1 shows the cable sample assemblies.
Equipment and Test Conditions
For the TDR time delay measurement, a sample assembly, fitted with precision open termination, was connected to the TDR and the round-trip time delay value was recorded using the instrument's built-in time delay measurement algorithm. The round trip time delay is taken as the difference in time between the active waveform (T2), representing the precision open circuit at the end of the sample assembly, and the stored waveform (T1), representing the open circuit at the TDR head. The time delay was recorded at a 375 mV level. The actual sample assembly time delay is one half the measured round-trip time delay, as shown in Figure 2.
Device time delay TDR = (T2 - T1)/2

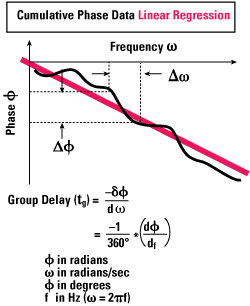
Figure 3 Group delay calculation as applied to S-parameter data.
For the VNA time delay measurement, the sample assembly was connected to VNA ports 1 and 2 and stimulated through a swept frequency range. Using proprietary software, cumulative phase information over the swept frequency range was extracted from the S21 data. The time delay was calculated by performing a least-squares curve fit, linear regression of the cumulative phase. The slope of the linear regression is the change in phase with respect to the change in frequency or the group delay (tg). The group delay value returned from this process is taken as the device time delay (see Figure 3).
Results of Experiment
Figure 4 illustrates the ± 3 sigma measurement uncertainty by sample for the TDR and VNA measurements. The following observations were made: measurement uncertainty for both instruments appeared to be device-under-test dependent; the median uncertainty across rounds was considerable; and the overall values for the VNA were significantly lower than those of the TDR. The figure also illustrates the instrument repeatability: the variability associated with measuring the same DUT repeatedly, while not disturbing it or the measurement system. This gives a window into the uncertainty of the instrument itself under the prevailing test conditions. It is predicated on the assumption that the DUT and any related fixtures are stable.
Rounds 1 and 2 were intended to capture the measurement system variability stemming from connect/disconnect cycling of the DUT, referred to as "measurement reproducibility." Connectors can affect measurement reproducibility, but SMA connectors, when new and in good condition, possess sufficient repeatability such that a significant influence on reproducibility was not anticipated. All six sample assemblies were equipped with SMA pin connectors. During the experiment each was thoroughly cleaned before every round and tightened to the appropriate torque value.
In a production test scenario, it is often necessary to re-measure a device for re-classification. Figure 5 shows that between rounds 1 and 2, the measured time delay of a sample differed, on average by 0.3 ps for the VNA and 4.2 ps for the TDR.

Figure 4 "Repeat testing" ±3 sigma uncetainty by test sample.

Figure 5 Average difference in measured time delay across six test samples from round 1 to round 2.
Analysis of Best-Case Performance
An initial review of the experiment indicated that one sample out of the six performed consistently better than the others in both TDR and VNA testing. The assembly, Sample 6, was identified as a best-case scenario for both instruments and selected to undergo additional analysis. A second experiment, similar to the first, was created to gather information on measurement uncertainty under best-case conditions. With identical instruments, test conditions and configurations, a new experiment consisting of the following was performed:
- Repeat testing consisted of 22 consecutive measurements without disconnecting/disturbing the DUT and test system
- Reproducibility testing consisted of 22 connect/disconnect cycles of the DUT, with measurements taken at each connect/disconnect cycle
- To ensure VNA/TDR test parity, VNA measurements were made using S11 reflection techniques as well as the more conventional S21 transmission method
The objective was to observe measurement uncertainty under more closely controlled conditions. Towards that end, during TDR testing the 3.5 mm precision open was left in place during all 22 connect/disconnect measurements; the sample assembly connection was cycled at the TDR sampling head only. Likewise during VNA testing, the sample assembly connection was cycled at port 1 only. This strategy, although not representative of production testing, does introduce a disturbance into the test system such that the outcome can be observed.
The number of measurements (22) was determined through a confidence interval calculation. Twenty-two measurements assure a 98 percent confidence that the sample mean in the experiment will be within ± 0.08 ps of the actual population mean. This is based upon an estimated standard deviation of 0.16 ps.
For this portion of the analysis, TDR and VNA measurement uncertainty was divided into three categories:
- Instrument uncertainty: Uncertainty associated with the instrument platform itself, measured through repeat testing.
- Total uncertainty: Uncertainty resulting from the cumulative effects of instrument characteristics, test fixture, test conditions and operator influences. Measured through connect/disconnect cycling, includes instrument uncertainty.
- Test uncertainty: Resulting from operator error, test fixture influences and prevailing environmental conditions at time of test, measured indirectly.

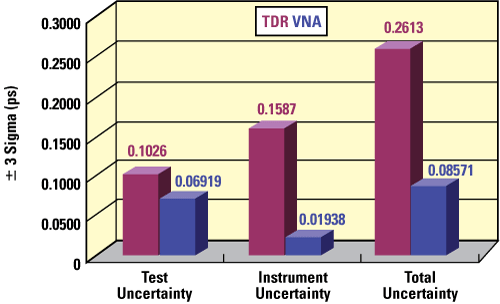
Figure 6 ± sigma uncertainty analysis baased on measurements of Sample 6.
Figure 6 shows best-case uncertainty for Sample 6. Test uncertainty values were expected to be similar in the TDR and VNA due to similarities in test configurations. With this information, the best-case uncertainty associated with each instrument platform can be assessed.

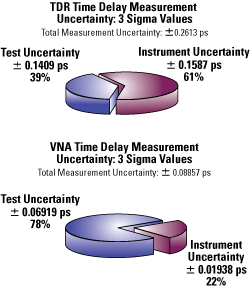
Figure 7 Total measurement uncertainty broken down by test and instrument uncertainties.

Figure 8 Twenty-two connect/disconnect measurements in sequence.
The pie graphs in Figure 7 reveal that 22 percent of the total measurement uncertainty for the VNA is associated with the instrument itself, as compared to 61 percent for the TDR. This was a repeating theme throughout the experiment. This significant difference means that even under ideal test conditions, that is minimal test fixture, operator and environmental influences, the gap in TDR/VNA measurement uncertainty will remain, as it is inherent to the instrument performance.
Figure 8 compares the 22 connect/disconnect delta time (Td) delay measurements of Sample 6 relative to the first measurement using the TDR and VNA. The VNA measurements have a range spanning 0.0983 ps as compared to the TDR's range of 0.275 ps. Both data clearly show a trend downward, that is a progressively shorter device delay. Although the TDR data suggests a repeatability issue with the 3.5 mm connector on the TDR sampling head, it was determined that the variability is associated not with the connector, but the instrument itself.
The downward-trending behavior noted may be attributed to burnishing of the SMA/3.5 mm mated interfaces. A 3.5 mm connector was used as the calibrated reference plane to which the test sample's SMA was mated. Connecting and disconnecting the SMA interface in succession (without cleaning between cycles, as was done in the experiment) has the potential to burnish the mated connector interface components. It was theorized that over the course of 22 test cycles, the mated interfaces were sufficiently abraded to experience improved electrical contact, as evidenced by a reduction in insertion loss and electrical length.
It is of some interest to compare the absolute time delay values for Sample 6 as measured by the TDR and VNA. An examination of repeat testing produced an average time delay of 0.817364 ns for the VNA and 0.849754 ns for the TDR; a difference of 32.5 ps. This discrepancy was unexpected and an attempt was made to obtain closer agreement between the two instruments.
The average time delay value of 0.849754 ns was referenced to an open circuit at the TDR sampling head, meaning the connection at the head was not terminated. The reflection from the resulting open circuit was stored as a reference waveform. Measurements of Sample 6 were taken with respect to this reference. To improve the agreement between TDR and VNA measurements, the sampling head was fitted with a 3.5 mm pin to 3.5 mm socket precision adapter ("connector saver") from a VNA calibration kit. The adapter provides a precise reference plane and sufficient electrical length to establish a new reference plane well away from the sampling head's 3.5 mm panel connector.
To define a new reference plane, a 3.5 mm (pin) precision open from a VNA calibration kit was used. The open was connected to the sampling head and the resulting waveform was stored as the new reference. TDR measurements of Sample 6 were conducted as described under Equipment and Test Conditions. The above-mentioned method of reference plane calibration was applied to the primary TDR used in this experiment as well as a second TDR of the same manufacturer.
TDR/VNA One-Port Measurement Comparison
To ensure TDR/VNA test parity, the VNA was re-configured from a two-port to a one-port calibration and best-case performance testing was repeated. DUT time delay data was extracted from the resulting S11 reflection data. Findings indicate virtually no change in VNA instrument uncertainty, as compared to two-port S21 data, and a decrease measurement uncertainty associated with connect/disconnect DUT testing.

Figure 9 Twenty-two connect/disconnect measurements of Sample 6 in sequence.
Figure 9 compares the 22 connect/disconnect performance of the TDR with that of the VNA, when using S11 reflection measurement techniques. As with earlier testing, the VNA's uncertainty is approximately an order of magnitude below that of the TDR under similar measurement conditions.
Conclusion
The findings suggest that before making critical production measurements with either a TDR or VNA, an understanding of DUT and measurement system interaction is necessary. Each has its strengths and weaknesses, but in the hands of a properly trained and experienced user, both are formidable tools. Data has been presented indicating that the VNA operates with a significantly lower level of measurement uncertainty under specific conditions. It is left to the reader to decide which best suits his or her needs given the application requirements.
Acknowledgment
The author extends his thanks to Jose G. Ramirez, Industrial Statistician, and Harmon Banning, Technologist, and W.L. Gore & Associates Inc. for its guidance and kind assistance in the writing of this technical note.
